


“Beep!” You no longer have to enviously watch Android users pass through the subway gates without a wallet. The era of convenient, wallet-free public transportation has finally dawned for iPhone and Apple Watch users, too. Finally, 28 months after Apple Pay launched in Korea, the long-awaited T-money transit card is now available in Apple Wallet for iPhone and Apple Watch.
A Complete Guide to Setup and Use : 2 Methods
Just like existing Android users, you can now simply tap your iPhone or Apple Watch on the card reader to conveniently pay for buses and subways. Notably, there are two different ways to use the transit card on your iPhone and Apple Watch, allowing you to choose the method that best suits your convenience.
In this blog post, we’ll provide a detailed guide, breaking down how to install and use the T-money transit card on your iPhone and Apple Watch in two different scenarios.
Before You Start : Prerequisites
1. Supported Devices
- iPhone : iPhone XS, XR, or later models with iOS 17.5 or higher.
- Apple Watch : Apple Watch Series 6, SE (2nd generation), or later models with watchOS 10.5 or higher.
2. Payment Methods
- Charging via Apple Wallet app : Apple Pay (Currently Hyundai Card only).
- Charging via T-money app : Credit/debit cards (Currently Hyundai Card only) or bank account transfer.
Method 1 : Use One Card and Transfer Between iPhone arrow_range Apple Watch
This is the most basic method. It involves issuing a T-money card on your iPhone and moving it to your Apple Watch as needed. You can’t use it on both devices simultaneously, but its advantage is convenient balance management since it’s a single card.
1. Installation
1.1 Adding a T-money Card to Your iPhone
- Open the Wallet app and tap the ‘+’ button in the top right corner.
- Select ‘Transit Card’ and choose ‘Tmoney’ from the list.
- Follow the on-screen instructions to select a top-up amount and complete the payment with the Hyundai Card registered in your Apple Pay. (If you have an existing physical T-money card, you can also transfer its balance.)
- We strongly recommend enabling the ‘Express Transit’ setting. This allows for immediate payment by just tapping your device on the reader without needing Face ID or a passcode, making it incredibly convenient.
1.2 Moving the T-money Card from Your iPhone to Your Apple Watch
- On your iPhone, open the Watch app.
- Go to the ‘Wallet & Apple Pay’ menu.
- From the ‘CARDS ON YOUR IPHONE’ list, tap the ‘Add’ button next to the T-money card you just added.
- Follow the on-screen instructions to move the card to your Apple Watch. Once the transfer is complete, the card will be deactivated in your iPhone’s Wallet and activated on your Apple Watch.
* Moving the card from Apple Watch to iPhone : You can move the card back to your iPhone using the same method in the Watch app’s ‘Wallet & Apple Pay’ menu. 
2. How to Use on Buses/Subways
2.1 Using with iPhone
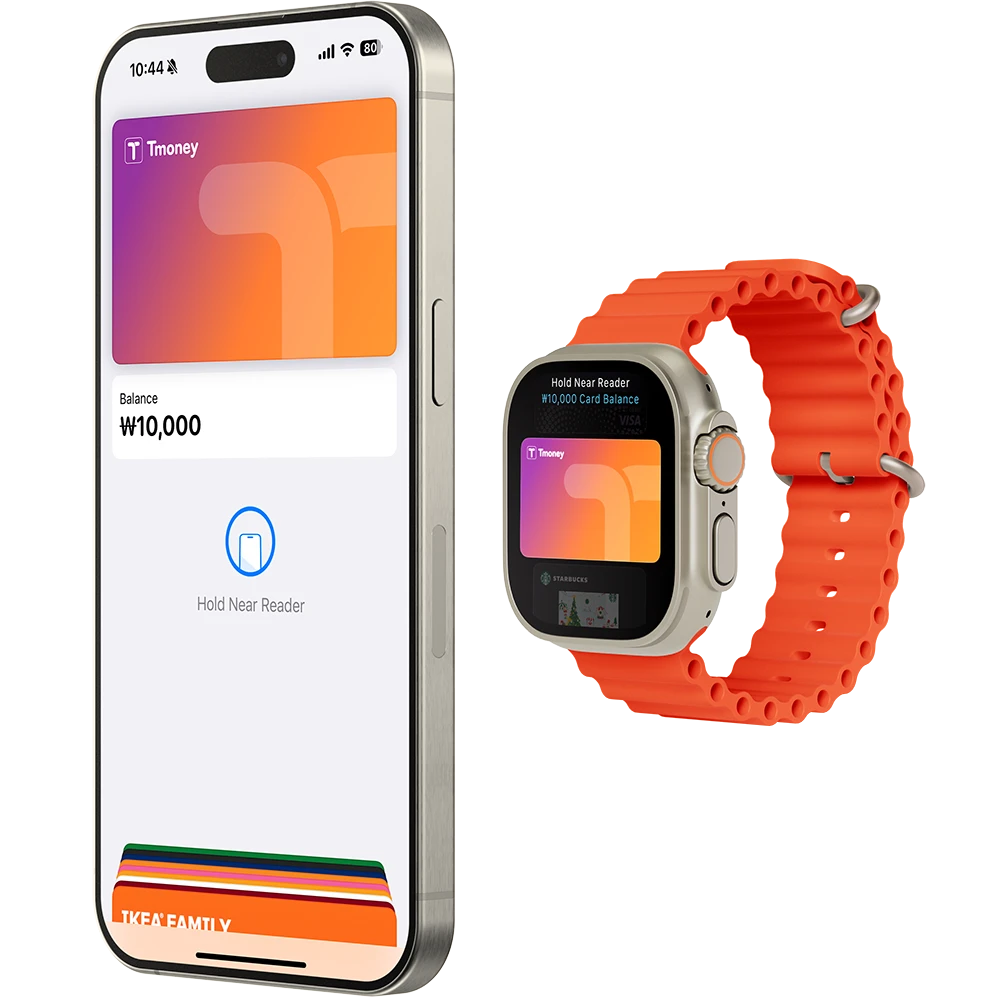
If ‘Express Mode’ is enabled, you can simply hold the top part of your iPhone (near the camera) close to the gate or bus terminal reader, even if the screen is off. A “beep” will confirm the payment is complete.
2.2 Using with Apple Watch
As long as the Apple Watch is on your wrist, simply tap the watch face on the reader without any extra steps to pay.
* Key Point : This method involves the card itself moving between devices. This means you can flawlessly enter the subway with your iPhone and then make a transfer using your Apple Watch.
Method 2 : Install Separate Cards on iPhone and Apple Watch
If you find it cumbersome to switch between your iPhone and Apple Watch depending on the situation, you can install a separate T-money card on each device to use them independently. This eliminates the need to transfer the card each time, but since it creates two separate cards, you’ll need to charge and manage the balance on each one individually.
1. Installation
1.1 Adding a T-money Card to Your iPhone
- Open the Wallet app and tap the ‘+’ button in the top right corner.
- Select ‘Transit Card’ and choose ‘Tmoney’ from the list.
- Follow the on-screen instructions to select a top-up amount and complete the payment with the Hyundai Card registered in your Apple Pay. (If you have an existing physical T-money card, you can also transfer its balance.)
- We strongly recommend enabling the ‘Express Transit’ setting. This allows for immediate payment by just tapping your device on the reader without needing Face ID or a passcode, making it incredibly convenient.
1.2 Install the Second T-money Card on Your Apple Watch
- This time, instead of using the Watch app on your iPhone, open the Wallet app directly on your Apple Watch.
- Tap ‘Add Card’ at the bottom right.
- Select ‘Transit Card’ > ‘Tmoney’ and follow the same on-screen instructions as on the iPhone to issue and charge a new card.
Now, if you check the Wallet apps on your iPhone and Apple Watch, you will see that each has a T-money card with a separate balance.
2. How to Use on Buses/Subways
2.1 Using with iPhone
If ‘Express Mode’ is enabled, you can simply hold the top part of your iPhone (near the camera) close to the gate or bus terminal reader, even if the screen is off. A “beep” will confirm the payment is complete.
2.2 Using with Apple Watch
As long as the Apple Watch is on your wrist, simply tap the watch face on the reader without any extra steps to pay.
* Important Note : With this method, the two cards operate completely independently. Therefore, if you tap in with your iPhone, you must also tap out with your iPhone. If you tap in with your Apple Watch, you must tap out with your Apple Watch to receive transfer discounts. (For example, using your iPhone for the subway and then your Apple Watch for a connecting bus will result in no transfer discount.)
Which Method Is Right for You?
상황에 따라 아이폰과 애플워치를 번갈아 사용하는 것이 번거롭다면, 각 기기에 별도의 티머니 카드를 설치하여 독립적으로 사용할 수 있습니다. 매번 카드를 이동시킬 필요가 없어 편리하지만, 두 개의 카드가 생성되는 것이므로 각각의 카드에 잔액을 충전하고 관리해야 합니다.
1. Single, Transferable Card — Recommended for
- Want to manage a single, unified balance.
- Primarily plan to use only one device (either the iPhone or the Apple Watch) for transit.
2. Separate Cards — Recommended for
- Frequently switch between using their iPhone and Apple Watch and find the card transfer process inconvenient.
- Don’t mind managing the balances of two separate cards.
The long-awaited wish of Apple users has finally been granted. Choose the method that fits your lifestyle, set up your T-money card, and enjoy a more convenient public transportation experience!